Mavericks, Xcode5, Boxen

タイトルがうまくまとまらない
久しぶりにscript/boxenをうってみたらこんなエラー

Fetching: json-1.8.1.gem (100%)
Building native extensions.  This could take a while...
ERROR:  Error installing json:
    ERROR: Failed to build gem native extension.

    /System/Library/Frameworks/Ruby.framework/Versions/2.0/usr/bin/ruby extconf.rb
mkmf.rb can't find header files for ruby at /System/Library/Frameworks/Ruby.framework/Versions/2.0/usr/lib/ruby/include/ruby.h

Gem files will remain installed in /Library/Ruby/Gems/2.0.0/gems/json-1.8.1 for inspection.
Results logged to /Library/Ruby/Gems/2.0.0/gems/json-1.8.1/ext/json/ext/generator/gem_make.out

1. XCodeのdevelopment commandline toolsのインストール&agreementが必要 (らしい)

$ sudo xcodebuild -license
........
By typing 'agree' you are agreeing to the terms of the software license agreements. Type 'print' to print them or anything else to cancel, [agree, print, cancel] agree

2. Rubyのバージョンによる問題らしい。configにパッチを当てる

curl https://gist.githubusercontent.com/Paulche/9713531/raw/1e57fbb440d36ca5607d1739cc6151f373b234b6/gistfile1.txt | sudo patch /System/Library/Frameworks/Ruby.framework/Versions/2.0/usr/lib/ruby/2.0.0/universal-darwin13/rbconfig.rb

3. script/boxen
成功!
Nexus5 Rootを取る!

ブート ローダーのアンロック

$ adb reboot bootloader

起動後に「Recovery mode」と表示された場合はボリュームアップボタンを押して「Start」

$ fastboot oem unlock

ボリュームアップボタンを押して「Yes」にカーソルを合わせ、電源ボタンを押します(この際、システムのデータが全て消去されます)。
ブートローダーのトップ画面に戻り、画面下のロック状態が「unlocked」となっていればアンロック成功です。

root化
https://www.dropbox.com/s/rd7ian622727o3b/CF-Auto-Root-hammerhead-hammerhead-nexus5.zip
ダウンロードして解凍。
root-mac.sh実行

Android エミュレータ高速化

Androidでは、AVD (Android Virtual Device) と呼ばれるエミュレーターを使い、デバッグを行うことができます。Android 4.0以前のAVDは、ARM CPUのエミュレーションのみでした。x86あるいはx64のCPU上では、異なるCPUのエミュレーションを行うため、起動に時間がかかったり動作が重かったんです。4.0.3以降になって、Intel x86のエミュレーションが追加されて、さらにCPUの仮想化支援機能や、ホストGPUサポートと組み合わせることにより、高速な仮想デバイスを作成することができるようになりました。

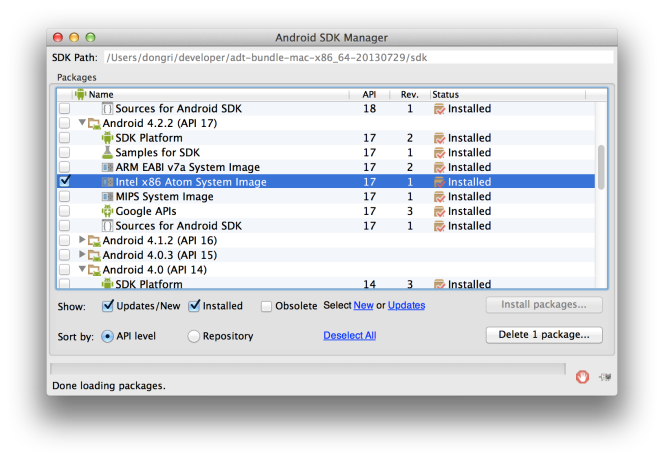
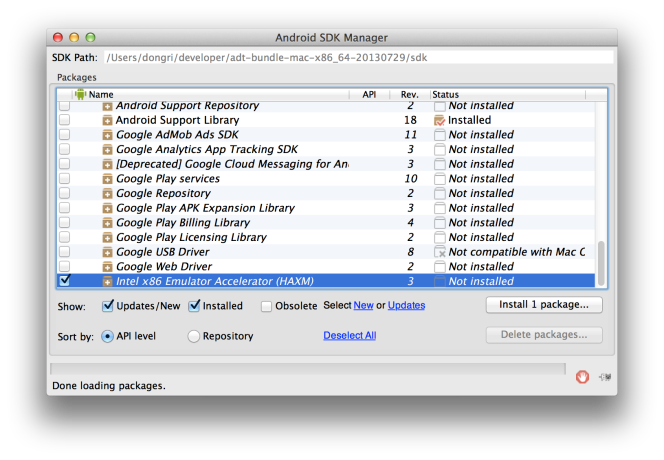
AndroidSDK Managerより、以下をダウンロード。
Extras/Intel x86 Emulator Accelerartor(HAXM)

Intel x86 Emulator Accelerartor
Android 4.2(API 17)/Intel x86 Atom System Image

Android 4.2(API 17)/Intel x86 Atom System Image

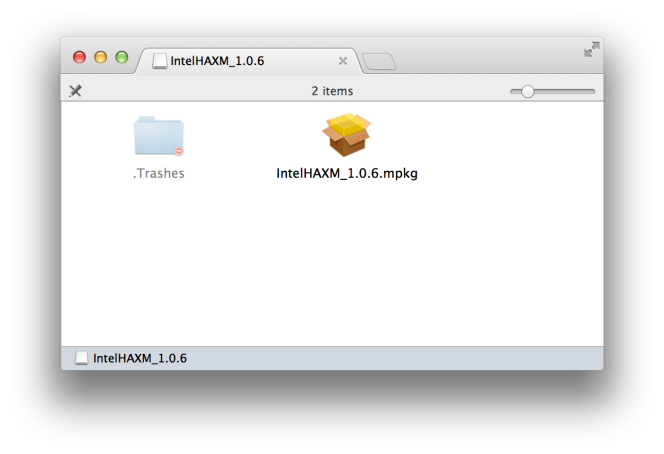
***/adt-bundle-mac-x86_64-20130729/sdk/extras/intel/Hardware_Accelerated_Execution_Manager/IntelHAXM.dmg
IntelHAXM.dmg ダブルクリック起動

IntelHAXM.dmg

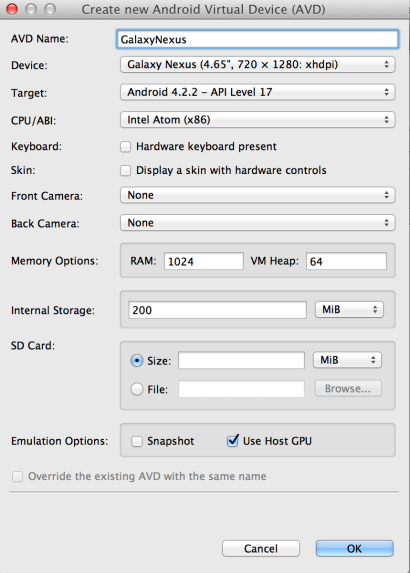
AVDの「CPU/ABI」から「Intel Atom (x86)」を選択して、Emulation Optionsも「Use Host GPU」にチェック入れとく。

Untitled

これで少しは快適になるはず!

Amazon SQSを使ってみる

環境:Max OSX 10.8, Perl5
CPANから「Amazon::SQS::Simple」をインストール
http://search.cpan.org/~penfold/Amazon-SQS-Simple-2.00/lib/Amazon/SQS/Simple.pm

$ sudo perl -MCPAN -e shell 
Password: 
cpan[1]> install Amazon::SQS::Simple

sender 作成

#!/usr/bin/env perl                                                                                                                       
use strict;
use warnings;
use Amazon::SQS::Simple;
my $access_key = "****";
my $secret_key = "****";
my $sqs = new Amazon::SQS::Simple( $access_key, $secret_key );
my $q = $sqs->CreateQueue('sample_flect_queue');
$q->SendMessage('Hello World');
exit 0;

receiver 作成

#!/usr/bin/env perl
use strict;
use warnings;
use Amazon::SQS::Simple;
my $access_key = "****";
my $secret_key = "****";
my $sqs = new Amazon::SQS::Simple( $access_key, $secret_key );
my $q = $sqs->CreateQueue('sample_flect_queue');
my $msg = $q->ReceiveMessage();
print $msg->MessageId() . "\n";
print $msg->MessageBody() . "\n";
$q->DeleteMessage( $msg->ReceiptHandle() );
exit 0;

実行してみる

$ perl sqs_msg_sender.pl
$ perl sqs_msg_receiver.pl
d6c7915c-9f19-4bbd-9ab6-a4c70e600a25
Hello World
$ 

RailsデフォルトPortを変える

Portが3000のやつがたくさん出てきたので、Railsのデフォルトポートを変えてみる。

1. script/rails

APP_PATH = File.expand_path('../../config/application',  __FILE__)
require File.expand_path('../../config/boot',  __FILE__)

# THIS IS NEW:
require "rails/commands/server"
module Rails
  class Server
    def default_options
      super.merge({
        :Port        => 3001,
        :environment => (ENV['RAILS_ENV'] || "development").dup,
        :daemonize   => false,
        :debugger    => false,
        :pid         => File.expand_path("tmp/pids/server.pid"),
        :config      => File.expand_path("config.ru")
      })
    end
  end
end
# END OF CHANGE
require 'rails/commands'

メリット:プロジェクトごとに変更可能。
デメリット:gitなどの共有される時にpushすると他人に影響を及ぼす

2. server.rb 編集

$ pwd
/Users/dongri/.rvm/gems/ruby-1.9.3-p374/gems/railties-3.2.13/lib/rails/commands
$ vim server.rb
    def default_options
      super.merge({
        :Port        => 3001,
        :environment => (ENV['RAILS_ENV'] || "development").dup,
        :daemonize   => false,
        :debugger    => false,
        :pid         => File.expand_path("tmp/pids/server.pid"),
        :config      => File.expand_path("config.ru")
      })
    end
$

メリット:自分だけの環境なので、gitなどで共有されず、他人に影響なし
デメリット:プロジェクト共通になる。

Macで複数Dropbox起動

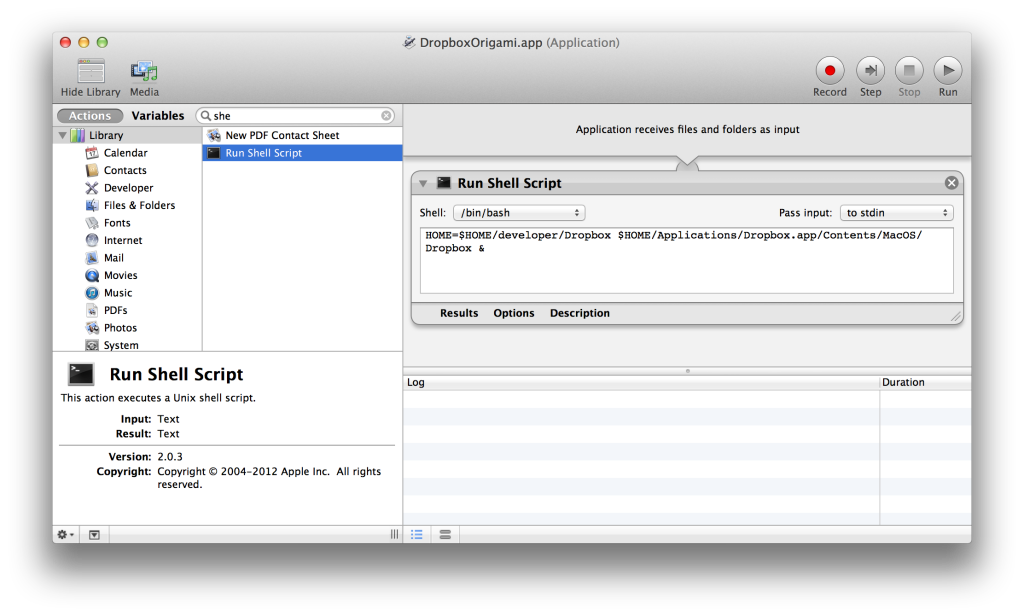
ApplicationsからAutomator.appを起動して、typeをApplication選択
検索窓で shell を検索検索して、Run Shell Scriptを選択

Screen Shot 2013-04-14 at 11.32.39

メニューからdropbox-work.appなどの名前で保存。保存したappファイルを起動。

Ubuntu PhonesをGalaxy Nexusに入れてみた

ubuntu
http://cdimage.ubuntu.com/ubuntu-touch-preview/quantal/mwc-demo/ から、

Galaxy Nexus向けのzipファイルをダウンロード

quantal-preinstalled-armel+maguro.zip
quantal-preinstalled-phablet-armhf.zip

ファイルを端末にコピー

$ adb push quantal-preinstalled-armel+maguro.zip /sdcard/
$ adb push quantal-preinstalled-phablet-armhf.zip /sdcard/

ClockworkModリカバリにリブート

$ adb reboot recovery

「install zip forom sdcard」から順番に
1. quantal-preinstalled-armel+maguro.zip
2. quantal-preinstalled-phablet-armhf.zip
「reboot system now」
Ubuntuきたー

で、3G回線だめ、Google Play使えない。

手動で Google Nexus (SC-04D) に Android4.2.2とroot化

https://developers.google.com/android/nexus/images#yakjujdq39 から yakju-jdq39-factory-b2ebb5f3.tgz ダウンロード

$ cd yakju-jdq39
$ adb reboot bootloader
$ ./flash-all.sh

これでAndroid 4.2.2バージョンアップ完了!
LionからMountain LionにアップグレードしたMacは原因わからないが、

ERROR: Unable to create a plug-in (e00002be)
< waiting for device >
ERROR: Unable to create a plug-in (e00002be)

上のようなエラーが発生。Google USB Driverが怪しいみたいけど、解決方法はわからず。

次はrootを取る。
http://clockworkmod.com/rommanager から recovery-clockwork-6.0.2.3-maguro.img ダウンロード
http://download.chainfire.eu/312/ から UPDATE-SuperSU-v1.10.zipをダウンロード

$ adb push UPDATE-SuperSU-v1.10.zip /sdcard/
$ adb reboot bootloader
$ fastboot boot recovery-clockwork-6.0.2.3-maguro.img ← これがないとRecovery Modeにした時壊れたDroid君が出る

UPDATE-SuperSU-v1.10.zipを選択してインストール!
これでroot化完了。

確認してみる。

$ adb shell
shell@android:/ $ su
root@android:/ # 

Screenshot_2013-02-26-21-28-31

追記:4.2.2にしてから adb で error: device offline 
Android SDKを最新にする。

$ adb version
Android Debug Bridge version 1.0.31